 Tagless Printers
 UV Flatbed Printers
 Pad Printing Machines
 Pretreatment Systems
 Inkjet Printing Auxiliary
 Laser Plate-Makers
 Inkjet Printing Supplies
 Pad Printing Supplies
 Tagless Supplies
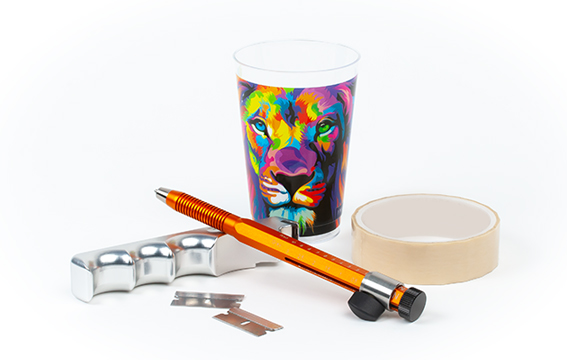
Adhesion requirements for UV digital printing on glass are set forth by the ASTM International Standards Organization. The ASTM defines and standardizes specific adhesion requirements for a variety of substrates. It is important to note that not all adhesion requirements are required for every product, however, familiarization is key. At Inkcups, we provide thorough, complimentary adhesion testing on glass, and any other substrate, according to your needs.
Our Process
Before performing adhesion testing on a product sample, we first ask our customers to fill out a sample request form. This form allows us to understand your desired adhesion criteria, current printing processes and pre-treatment needs. Once we determine that our team can help you meet your printing goals, we ask that you send us at least 10-15 samples to perform testing on.
After all the necessary adhesion requirements have been outlined, it is now time to start printing. First, the glass is wiped down with a lint free towel. Inkcups’ specially formulated MagiCoat® system flame treats the glass before evenly coating it with our water-based MagiCoat® primer. Next, an image is digitally printed on the item. There are four ASTM standardized tests for measuring adhesion that occurs in the order listed below. Our technicians will use prior knowledge and experimentation with different inks, primers, and pretreatments until the finished product meets or exceeds our customers’ expectations.
Additional tests such as the ice bucket and dishwasher test (commercial and/or residential) can also be completed upon the customer’s request. Once the adhesion testing on glass is complete, we write up a detailed report of what type of printing method was used, the adhesion tests it passed, and overall resistance. Afterward, samples are photographed and sent back to you for a final evaluation.
1.Tape Adhesion Test
The first method of adhesion testing on glass is the mildest. To perform this test, simply adhere a piece of pressure-sensitive tape onto the decoration and apply firm pressure with your thumb. Then, peel back the tape at a 180-degree angle. If any ink comes up, the test has failed, and the adhesion is inadequate. The object passes the test if no ink comes off on the tape.
2. Scratch Adhesion Test
The scratch test utilizes a pen-like tool called a sclerometer. This tool was specifically designed to measure the scratch hardness of the substrate.
To begin, loosen the screw on the collar and move the scale to 8 Newtons of force.
The sclerometer should be held perpendicular to the object being tested. It must be dragged from the outside of the image downwards through the ink. The test has passed if no ink comes off or if there is a line but no jagged edges.
3. Crosshatch A Adhesion Test
To complete the crosshatch test, use a razor blade to make an X-cut on the substrate. Then, apply pressure-sensitive tape, just like the tape test, and remove it at a 180-degree angle. If any ink comes off, the object has failed the adhesion testing on the glass.
4. Crosshatch B Adhesion Test
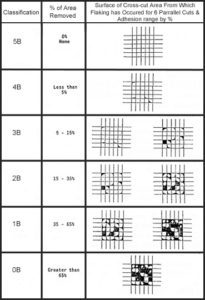
This test must be performed with a multi-tooth adhesion cutter. Drag the blades across the decorated surface of the glass through .75 to 1 inch. Repeat this process with a second cut intersecting the first cut as close to a 90-degree angle as possible, forming a lattice pattern. The results are evaluated according to the ASTM standard classification chart below. A score of 5 is optimal, indicating that all the squares remained intact.
As mentioned in section 1.3 of the ASTM International guidelines, “these test methods are used to establish whether the adhesion of a coating to a substrate is at a generally adequate level. They do not distinguish between higher levels of adhesion for which more sophisticated methods of measurement are required.” For testing purposes, we ensure a generally adequate level of adhesion. As mentioned above, additional tests can be performed upon request. It is extremely important to the team at Inkcups that we satisfy all our customers to the best of our ability. We continue to offer in-house color matching, adhesion testing, and technical support to ensure satisfied customers and the highest quality products on the market.
Listen to our experts discuss ink adhesion testing methods for digital printing.
Add Your Comment